
Autumn porch cross stitch is a particularly satisfying fall theme because it tells a whole story without needing a person in the scene: a welcoming doorway, a rocking chair, a folded plaid blanket, pumpkins on the steps, sunflowers and a seasonal wreath. For a darker October interpretation of cottagecore decor, explore our cute gothic cemetery cross stitch guide. It can become a piece of cottagecore wall art that feels equally at home in September, October or Thanksgiving season. Yet the difference between a relaxing stitch and a frustrating one often comes down to decisions made before the first thread is cut.
This practical guide looks at the 200 × 200-stitch Autumn Porch design described in the original PurePlateStudio Etsy listing. We explain the confirmed chart dimensions, fabric and cutting calculations, where to begin, how to manage detailed autumn shapes, and what to do when similar shades make counting difficult. We also include a completely separate original mini pumpkin practice chart and real framing dimensions. This article is independently written by XStitchPattern; we do not sell, reproduce or provide the reference seller’s PDF here.
What makes a fall front porch cross stitch design work?
Think about the porch as a miniature stage. The door and vertical posts provide architecture. The chair gives the composition a human scale. Pumpkins and sunflowers create a foreground that announces autumn, while the wreath and blanket repeat the season’s warmer colors higher up the scene. These layers give the eye somewhere to travel, which is why a detailed front porch design often looks more complete when framed than a group of unrelated seasonal motifs.
The referenced Etsy listing describes a brown doorway, a dark rocking chair with a red-and-white plaid throw, a wreath, sunflowers and both orange and pale pumpkins. That is a useful visual inventory for planning stitching order, but it does not reveal the full symbol chart, the position of every stitch, the quantity of each floss color or whether backstitch is used. The seller also lists two PDF files; check the current product details before purchasing. View the actual reference pattern on Etsy when you want its precise artwork.
For readers looking for other designs to make and gift rather than this particular reference chart, the XStitchPattern Etsy shop contains our own separately offered patterns. Our Autumn Porch inspiration shopping page explains the difference between the reference chart and our own Etsy inventory. The original PurePlateStudio design is not implied to be in our inventory.
200 × 200 stitches: confirmed size and what it does not mean
The seller’s dimension graphic states 200 stitches wide × 200 stitches high. The chart therefore has 40,000 possible grid positions. That figure is not a verified total of 40,000 embroidered crosses: an open background may contain unstitched areas. Nor can we infer thread consumption or hours of work from the grid alone. Only the actual chart and color key can establish how many cells use each thread, and even then working habits affect floss use.
| Detail | What is supported | What needs the actual pattern |
|---|---|---|
| Theme | Front porch, chair, blanket, pumpkins, wreath and sunflowers | Exact placement, backstitch instructions or extra embellishments |
| Stitch grid | 200 × 200 stitches (Etsy dimension graphic) | Number of filled squares and time required |
| Delivery | Digital listing described as two PDF files | Their exact page layouts and compatibility with any chart-reader app |
| Threads | A floss color key is pictured in the listing | Actual thread inventory needed for your work and dye-lot availability |
| Artwork rights | Original reference is offered by PurePlateStudio | Any right to redistribute its images or chart |
How big will a 200 × 200 porch design be on Aida?
The formula is straightforward: stitches ÷ fabric count = design size in inches. For 14-count Aida, 200 ÷ 14 = 14.29 inches on each side; for 16-count, it is 12.5 inches. Multiply by 2.54 for centimeters. The calculation assumes one cross per Aida square. Linen or evenweave stitched over two fabric threads has a different effective count.
| Fabric | Stitched area (approx.) | Stitched area (cm) | Fabric cut with 3 in / 7.62 cm margin on every side |
|---|---|---|---|
| 14-count Aida | 14.29 × 14.29 in | 36.3 × 36.3 cm | 20.29 × 20.29 in (51.5 × 51.5 cm) |
| 16-count Aida | 12.50 × 12.50 in | 31.8 × 31.8 cm | 18.50 × 18.50 in (47.0 × 47.0 cm) |
| 18-count Aida | 11.11 × 11.11 in | 28.2 × 28.2 cm | 17.11 × 17.11 in (43.5 × 43.5 cm) |
| 20-count Aida | 10.00 × 10.00 in | 25.4 × 25.4 cm | 16.00 × 16.00 in (40.6 × 40.6 cm) |
The fabric-cut figures leave three extra inches on each side for hooping, lacing or mounting. They are planning recommendations, not dimensions supplied by the seller. You may need a larger margin for a particular frame. DMC’s own fabric-preparation guide recommends roughly 8 cm of clear fabric around a framed design. Order the next comfortable fabric size above your calculated cut rather than trimming your margin too closely.
If you enjoy large statement pieces, compare our separate Cozy Fall Vibes fabric-sizing guide, which uses a very different 260 × 254 grid. Those numbers describe another reference design, not this porch chart.
Choose the best Aida count for a cozy porch scene
14-count Aida offers comparatively visible holes and a larger finished picture. It is the most forgiving choice when you are returning to counted cross stitch or working under ordinary room lighting. Fine diagonals in chair rails may look a little more pixelated because each cross is larger, but the overall seasonal mood can still read clearly from a few feet away.
16-count Aida often feels like a practical middle ground: the 12.5-inch finished square is easier to place on a shelf or wall, and pumpkin curves can look somewhat more compact without forcing you into tiny stitches. It can suit an experienced beginner who is comfortable checking the chart regularly.
18-count Aida reduces the design to just over 11 inches square. This can look refined in a small frame, but the closer spacing asks more of your lighting, needle choice and eyesight. If your working sessions are short or your hands tire easily, a larger count is not automatically an improvement.
| Decision | Consider 14 count | Consider 16 count | Consider 18 count |
|---|---|---|---|
| Visibility | Best of these three for clearly separated holes | Moderate | Requires the most visual precision |
| Picture size | Largest | Medium | Smallest |
| Framing | Needs more wall space | Versatile square | Compact square |
| Best fit | Relaxed, easy-to-follow stitching | Balance of detail and size | Fine-looking piece and good lighting |
A higher count does not create additional chart detail. You still stitch the same number of chart squares; you simply place those squares closer together. Before buying cream, antique white or natural Aida, compare a real floss sample against the cloth. White pumpkins can disappear against bright white fabric if the chart leaves open background or uses very pale stitches. Conversely, a darker linen can reduce contrast in the black rocking-chair silhouette.
Get a free cross stitch PDF and join the Stitch Studio
Want a small project before starting the full porch scene? Subscribe to the XStitchPattern Stitch Studio below. Tick the email-consent box, confirm your subscription in the email we send, and follow the instructions for your free pattern. This is our own freebie; it is not the PurePlateStudio Autumn Porch PDF. You can also use the free cross stitch pattern signup page if the form does not load.
Build a fall palette without losing the architectural detail
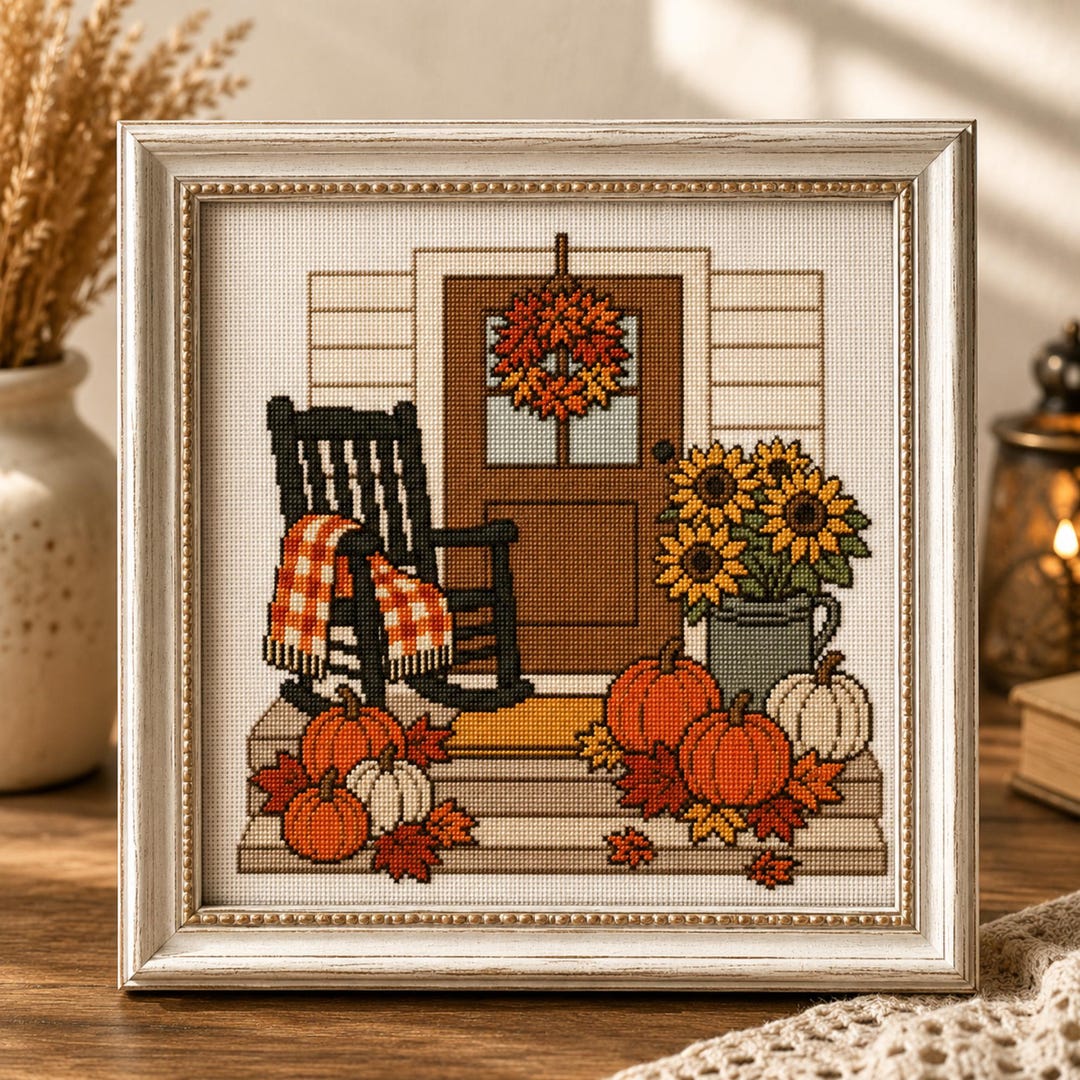
Porch scenes work because warm and cool areas share the workload. The brick, wood, blanket and pumpkins provide a warm base. A neutral door, dark chair and pale stone steps create the structure that stops all those oranges from blending into one patch. When looking at an actual thread key, sort the colors into groups before organizing by symbol; this is especially helpful when two oranges differ only slightly.
| Visual area | Color family to look for | Practical stitching challenge |
|---|---|---|
| Pumpkins | Soft apricot, pumpkin orange, rust | Keep rounded sections separate from stems and leaves |
| Sunflowers | Gold, mustard, brown | Avoid confusing the dark seed centers with shadowed petals |
| Rocking chair | Charcoal, black-brown | Check gaps around the spindles carefully |
| Plaid throw | Cream, brick red, muted burgundy | Repeat lines consistently and count twice at intersections |
| Door and steps | Brown, taupe, stone gray | Use the architectural outlines as counting landmarks |
| Wreath and foliage | Sage, olive, deep green | Keep leaf clusters distinct from nearby woodwork |
These are illustrative color families, not verified thread codes or a substitute color list for the commercial pattern. Do not purchase floss from this table alone. Buy from the included chart key and only make substitutions after laying your candidate strands beside one another in daylight. A brighter orange can be beautiful but may also merge with sunflower petals when every warm tone has the same value.
For a very different autumn palette built around animals rather than architecture, see our Autumn Cats fall-leaves color guide. It is a useful companion for understanding contrast, although it is a separate stitching project.
A practical stitching order for doors, rocking chairs and pumpkins
There is no single mandatory stitching sequence. However, picking landmarks reduces counting mistakes in a scene that mixes long, straight elements with rounded pumpkin shapes. Before committing, inspect the chart legend for full crosses, half stitches, backstitch, special symbols and any notes from the designer. Do not infer those stitch types from a product photograph.
1. Prepare the cloth and establish the center
Cut the fabric according to the measurement table and finish the raw edges with a zigzag stitch, overlock, binding or another method that will not damage your working area. Find the middle by gently folding the cloth in half horizontally and vertically, then mark the intersection with a removable basting stitch. If you use a water-soluble marker, test it on a scrap of the same fabric and keep it away from heat until removed.
2. Start from a recognizable structural anchor
The central doorway or a clean horizontal step can be easier to verify than disconnected falling leaves. If you prefer center-out stitching, find the chart’s center symbol and follow that instruction first. If you prefer parking or stitching by section, count from the center to your chosen starting point twice. A little preparation saves the pain of discovering that a whole chair has shifted by one square.
3. Stitch one neighborhood of colors at a time
A sensible order is architecture, major dark shapes, prominent pumpkins, flowers and then small accents. An equally sensible alternative is to finish every section of a 10 × 10 chart grid before moving on. Either way, do not carry dark thread behind broad light-colored empty fabric where it may show through. If two separated motifs share a color, start a new thread rather than stretching one across a large distance on the reverse.
4. Protect the thin chair elements
Rocking-chair legs, curved runners and back slats are easy to miscount because long dark edges are interrupted by lighter background. Work with a brightly lit chart and count the space around each narrow bar as carefully as the bar itself. If the chart uses backstitch, save it for the stage specified by the designer; do not invent outlines simply because the Etsy mockup looks crisp.
5. Finish the foreground as a deliberate cluster
Pumpkin clusters are usually easier to read when one rounded silhouette is finished before the next. Use a needle parked safely outside the chart while comparing stem positions. The goal is to avoid turning several pale and orange shapes into one continuous mass. After the major sections, take a photo from several feet away: your eye may spot a missing gap that is difficult to notice at stitching distance.
Thread organization that prevents slowdowns
The most useful thread organizer is not necessarily the most expensive. A set of numbered or symbol-labelled cards, a pencil, a spare tapestry needle and a small project tray are enough to separate similar hues. Write chart symbols next to the official floss numbers, then group them by area of the picture. If you use a digital chart tracker, verify that the purchased file actually supports your app before buying.
- Keep a working card with the current symbols and thread names, but preserve the seller’s original color key as the authority.
- Attach one short sample of each similar orange to the card; visual comparison is faster than relying on names alone.
- Use a needle minder or covered tray when switching between dark chair colors and light pumpkin highlights.
- Keep a notebook of any deliberate substitutions so you can match them when you return after several weeks.
- Before each session, mark where you stopped on the chart rather than relying on memory the next day.
For particularly long projects, a lightweight progress routine helps: photograph the same corner each week and write down the last finished grid reference. Do not use a percentage complete calculated from the entire 200 × 200 square unless you know how many cells actually contain stitches. Empty background is not stitching time.
What about full coverage, two PDF files and pattern readers?
The reference page says the design is 200 × 200 stitches and lists two downloadable PDF files. That is useful purchase information, but it does not answer everything. A color symbol chart and a black-and-white symbol chart may be pictured, yet the listing itself is the place to confirm current package details. We have not opened or stitched the paid PDF, so we cannot guarantee any particular chart page count, backstitch layer, digital-reader export or stitched sample accuracy.
Before purchasing a large pattern from any seller, check whether the examples show a legible symbol key, whether a printer-friendly version exists, whether the finished art is photographed or digitally mocked up, and how the shop handles questions. If you stitch on a phone or tablet, ask specifically about your reader instead of assuming that a PDF title means universal support.
A non-full-coverage scene can still have dense areas where the symbol grid is visually busy, especially around a wreath or flower bouquet. Conversely, 200 × 200 cells does not necessarily mean you must fill every cell. These distinctions matter more than a marketing phrase like “easy” or “instant.”
Common mistakes and how to recover
| Problem | Likely reason | What to do next |
|---|---|---|
| Chair looks one stitch crooked | Lost count around a narrow spindle | Compare the nearest confirmed landmark on the chart; unpick only the affected area |
| Pumpkins blend together | Similar orange values or missed outlines | Recheck chart symbols and leave intentional gaps unfilled |
| Blanket plaid seems irregular | A repeated stripe shifted at an intersection | Locate the first incorrect crossing and work forward from it |
| Finished art is larger than planned | Fabric count was mistaken or changed | Measure ten fabric squares and recalculate before investing more stitches |
| Pale pumpkins disappear | Low contrast with fabric or other pale floss | Review the designer’s intended color plan before substituting anything |
| Threads show through the back | Long dark carries behind pale areas | End and restart floss closer to each motif rather than traveling across the back |
| Frame covers a corner motif | Insufficient fabric or mounting margin | Check mat opening and frame dimensions before washing or trimming |
When you notice an error, avoid undoing several hours of stitching immediately. First establish a correct point and count outward. A wrong symbol color in one pumpkin may be harmless; a missing column can misalign the entire porch. The best repair is the smallest one that restores the chart’s structure.
Try a free original 11 × 11 mini pumpkin practice chart
Before committing to a large cottagecore scene, use this tiny original XStitchPattern practice motif to rehearse counting, stem placement and two-tone orange contrast. It is not extracted from, based on, or included in the reference seller’s pattern. This chart has not been physically test-stitched, so treat it as a practice exercise rather than a professionally test-stitched commercial download.
...........
.....G.....
....GGG....
...OOOOO...
..OSOOOSO..
.OOSOOOSOO.
.OOSOOOSOO.
.OOSOOOSOO.
..OSOOOSO..
...OOOOO...
...........
Legend: . leave unstitched; G olive or forest green for the stem; O medium pumpkin orange; S a slightly deeper orange for simple ribs. These are color suggestions only—not DMC numbers. Work one full cross per lettered square, with top legs in the same direction. On 14-count Aida the 11-square width is approximately 0.79 in (2.0 cm). Add extra cloth if you intend to make it into an ornament.
To test the contrast, stitch the orange body first and add the deeper-orange rib rows second. If the ribs vanish when seen from arm’s length, try a deeper shade. This tiny test illustrates the same design principle that matters in a porch chart: separate surfaces need distinguishable values, not merely different thread names.
How to finish a cottagecore fall porch stitch
A 200 × 200-square design lends itself to a square presentation. The most straightforward finish is a neutral frame with a modest mat or spacers so the stitches do not press tightly against glazing. If a large square feels visually heavy, look for a thin wood frame whose tone echoes the door or rocking chair. A narrow cream mat can preserve the brighter highlights, while a warm walnut frame may reinforce the farmhouse mood.
A small seasonal gallery wall
Try a porch embroidery centerpiece surrounded by smaller autumn needlework, such as Autumn Squares sampler ideas or the compact motifs in our 12 Mini Autumn Cross Stitch guide. Their exact layouts are separate from the reference porch design, but a shared palette—warm rust, gold, cream and dark brown—can create a coordinated display without repeating the same subject.
Washing and pressing without flattening stitches
If washing is appropriate for your specific thread and fabric, test colorfastness first and follow the material manufacturer’s guidance. DMC advises gentle hand washing with suitable detergent, rinsing well, rolling between towels instead of wringing, and pressing on the reverse between protective towels. The official DMC finished-needlework care guide describes those precautions. Do not wash a project with unknown dye behavior simply because washing is common for cotton floss.
Keep the design appealing after the holidays
Pumpkins and sunflowers naturally belong to autumn, but a porch scene often looks more like a quiet home portrait than a one-week holiday sign. That makes it suitable for a September-to-November display. Store it in a dry place, away from prolonged direct sunlight. If you change wall art each season, choose reversible mounting materials and protect the finished stitch from dust rather than taping the back directly to cardboard.
Frequently asked questions about autumn porch cross stitch
Is the referenced Autumn Porch pattern beginner-friendly?
A confident beginner can approach a 200 × 200 design with patience, especially on 14-count Aida, but the full size is a commitment. Check the seller’s actual chart complexity and any specialty stitches before deciding. A small pumpkin practice motif is an easier first project.
What is the finished size on 16-count Aida?
For the documented 200 × 200 grid, 200 ÷ 16 = 12.5 × 12.5 inches, about 31.8 × 31.8 cm for the stitched area. Add fabric on all four sides before cutting.
Does 200 × 200 mean 40,000 actual stitches?
No. It means 40,000 potential positions in the rectangular chart grid. The real number of worked crosses depends on whether there is blank background and which stitches the designer uses.
Do I need the exact DMC colors in the photo?
Use the chart’s official thread key for the intended result. Photos and monitor colors can vary; choose substitutions only when you can compare actual skeins. This guide does not provide or invent a DMC conversion list for the commercial PDF.
Can I get the same Autumn Porch PDF from XStitchPattern?
No claim is made that the PurePlateStudio Autumn Porch chart is available in the XStitchPattern catalog. For that exact chart, follow the original seller. To browse different patterns from our shop, visit XStitchPattern on Etsy.
Should I display it in a hoop or a picture frame?
Both are possible if the display format accommodates the stitched square and enough surrounding fabric. A full 200 × 200 design may be better suited to a frame than a small hoop. Decide before cutting, since mounting margins cannot be added later.
What is the difference between a counted PDF chart and a finished embroidery?
A counted chart supplies a grid and symbols for you to stitch on cloth. It is not a stitched object and generally does not include ready-made décor. Always check the precise digital delivery and supplies listed by the seller.
Where to find the original pattern and explore more fall designs
For the specific rocking-chair, plaid-blanket and pumpkin porch artwork discussed here, visit PurePlateStudio’s Autumn Porch Etsy listing. Its designer owns the original product imagery and PDF. This article provides independent technique advice, measurement calculations and a separate original practice chart, not a licensed copy of the reference design.
For XStitchPattern’s own different cross stitch patterns, visit our Etsy store, read the Autumn Acorn planning guide, or sign up for a free pattern by email. If you prefer tiny seasonal motifs to a larger porch scene, start with our mini autumn articles and move to a full-size project when you are ready.
Artwork credit: The pictured Autumn Porch reference artwork is from the PurePlateStudio Etsy listing. Image and commercial chart are credited to the original seller; no transfer of rights or inclusion of the seller’s PDF is implied. Fabric-size math is independently calculated from the 200 × 200-stitch dimensions shown in the Etsy listing. The guide and free practice motif have not been physically test-stitched.